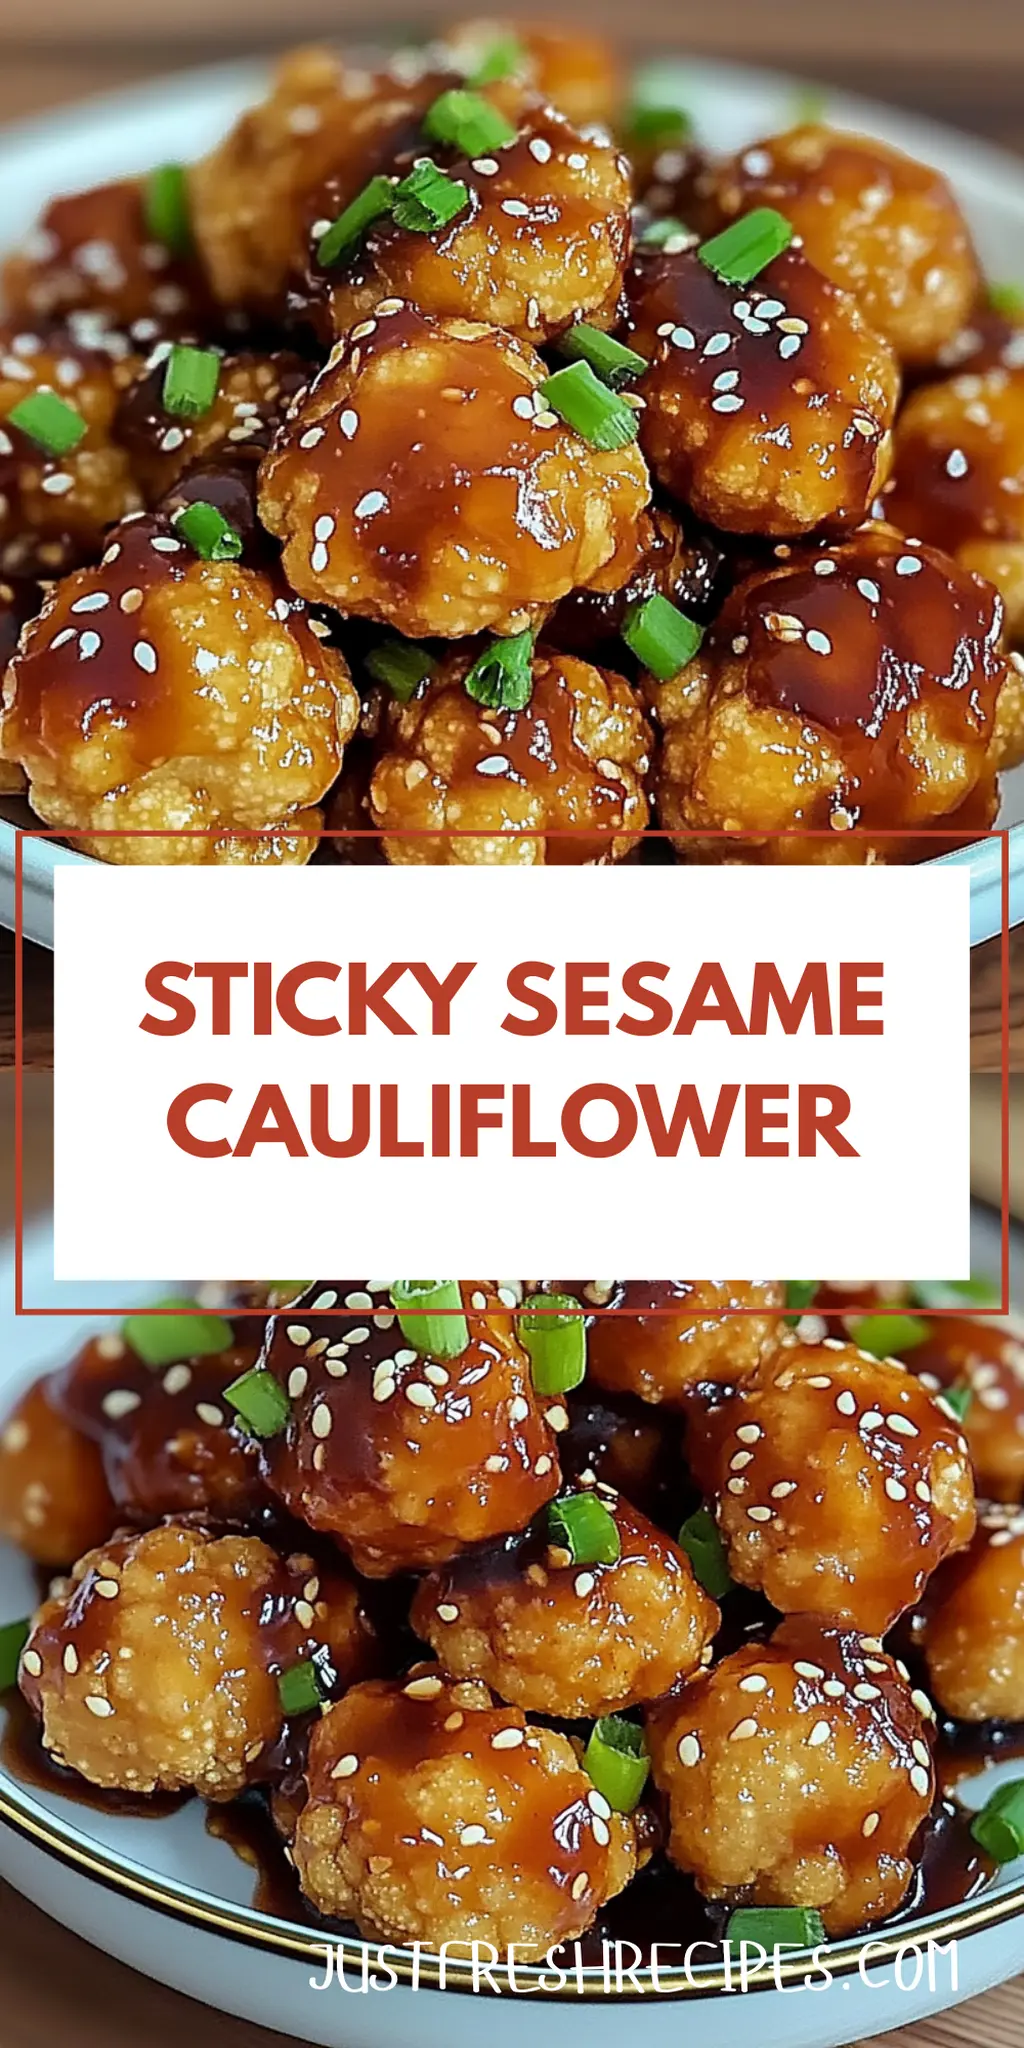
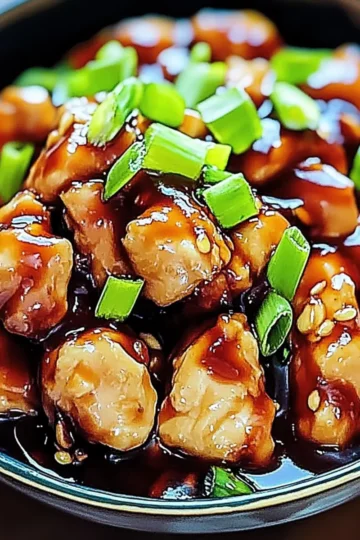
There's something undeniably satisfying about transforming humble ingredients into a dish that feels like a celebration. When I first discovered Sticky Sesame Cauliflower, I was pleasantly surprised by how effortlessly it turned everyday cauliflower into a flavor-packed feast. Imagine biting into perfectly crispy florets coated in a luscious, sweet-savory sauce, and you'll know why this dish has become a staple in my kitchen.
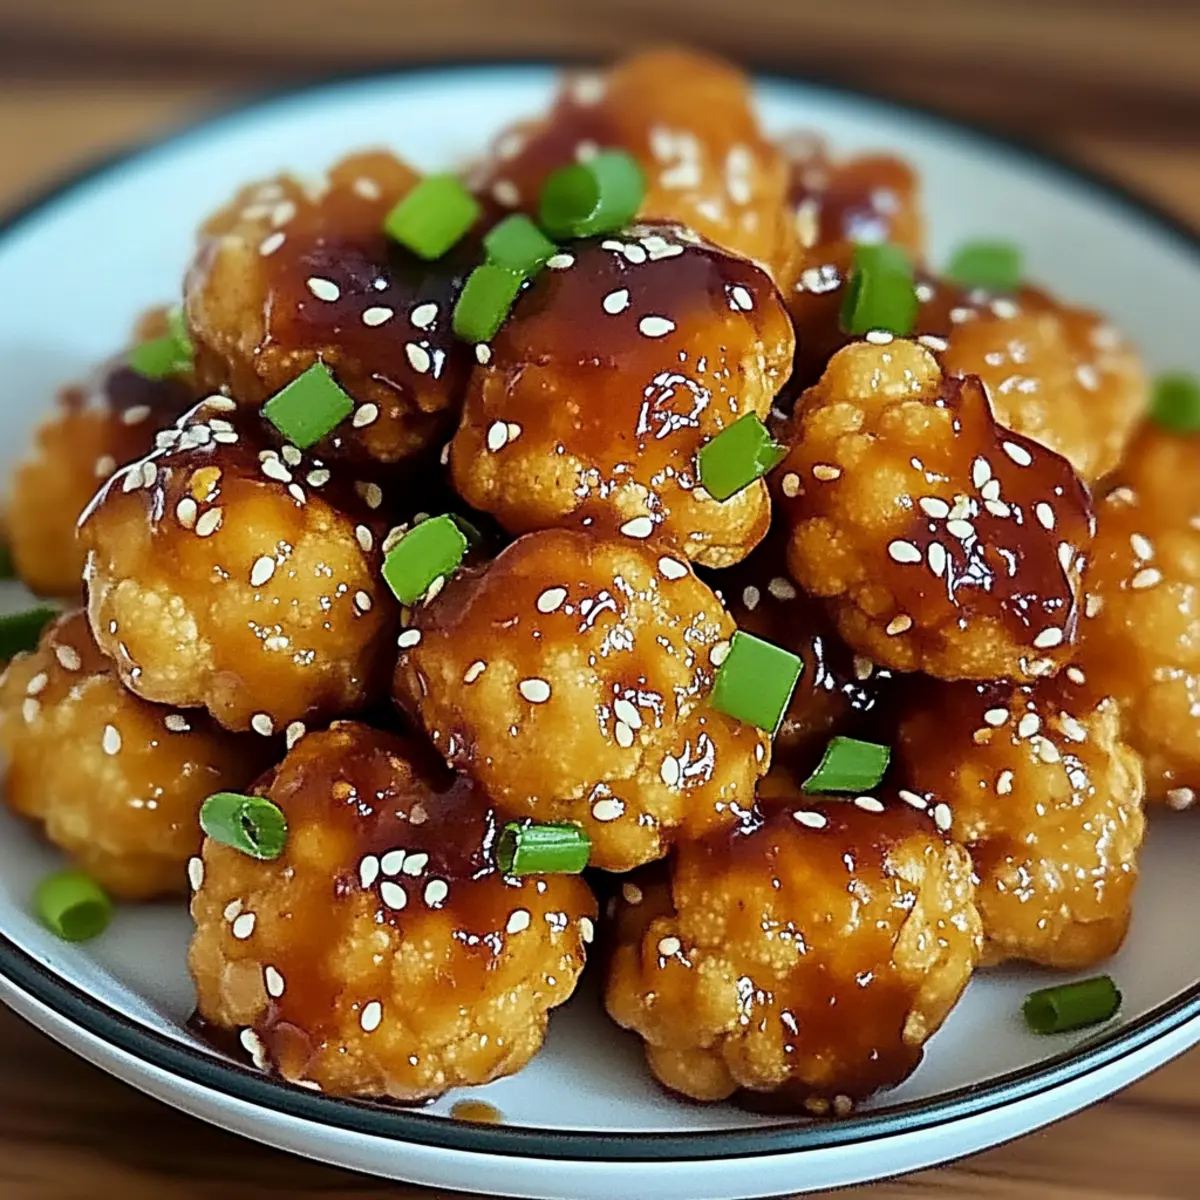
With its delicate crunch and rich, sticky glaze, this recipe not only pleases the palate but also appeals to those looking for a healthier alternative to fast food. Whether you're serving it up for a cozy family dinner or impressing friends at your next gathering, the simplicity and bold flavors of this dish never fail to impress. Plus, it comes together in just 45 minutes—perfect for busy weeknights!
Join me as we dive into the world of Sticky Sesame Cauliflower, where you'll discover how easy it is to create a meal that's both delicious and satisfying. Let’s get cooking!
Why You'll Love This Sticky Sesame Cauliflower
- This Sticky Sesame Cauliflower is incredibly easy to prepare, making it a great option for busy weeknights.
- The combination of crispy cauliflower and a rich, sticky glaze creates an explosion of flavor that will have everyone asking for seconds.
- Its versatility means you can serve it as a main dish, a side, or even as an appetizer at gatherings.
- Visually, the dish is stunning, thanks to the vibrant garnishes and the golden-brown florets that make it a showstopper on any table.
Sticky Sesame Cauliflower Ingredients
For the Cauliflower
• Medium head cauliflower – cut into florets for that perfect bite-sized crispiness.
• Rice flour – provides a light, crispy coating that pairs beautifully with the sauce.
• Cornstarch – helps to achieve that crunchy exterior; don't skip this!
• Garlic powder – adds a subtle depth of flavor to the batter.
• Salt – enhances the flavors of the cauliflower and the sauce.
• Black pepper – a dash gives a hint of heat to balance the sweetness.
• Water – used to create a smooth batter; adjust as needed for consistency.
• Sesame oil – infuses the dish with a delightful nutty flavor.
For the Sauce
• Fresh ginger – grated for a zesty kick that brightens the dish.
• Garlic – minced for that robust flavor; fresh is always best!
• Soy sauce or tamari – adds a savory umami richness; tamari is great for gluten-free.
• Maple syrup or honey – brings the necessary sweetness to balance the savory elements.
• Rice vinegar – adds a tangy depth that cuts through the richness.
• Sriracha (optional) – for those who like a kick; adjust amount to your spice preference.
For the Glaze
• Cornstarch – used with cold water to thicken the sauce into a sticky glaze.
• Cold water – helps create a smooth slurry for a perfect sauce consistency.
How to Make Sticky Sesame Cauliflower
-
Preheat your oven to 425°F and line a baking sheet with parchment paper. This step is crucial for achieving crispy cauliflower without sticking!
-
Whisk together the rice flour, cornstarch, garlic powder, salt, and black pepper in a large bowl. Add the water and sesame oil, mixing until you have a smooth batter that effortlessly clings to the florets.
-
Coat the cauliflower florets by adding them to the batter and tossing gently until evenly covered. Transfer the battered cauliflower to the prepared baking sheet, ensuring they’re spread out in a single layer for even cooking.
-
Bake for 25-30 minutes, flipping halfway through. Look for a golden brown color and crispy texture—this will create that delightful crunch.
-
Sauté the ginger and garlic in a skillet with 2 teaspoons of sesame oil over medium heat. Cook for about 1 minute until fragrant, then stir in the soy sauce, maple syrup (or honey), rice vinegar, and optional sriracha, bringing everything to a simmer.
-
Create the glaze by whisking together cornstarch and cold water in a small bowl. Pour this mixture into the simmering sauce slowly, stirring constantly until it thickens and becomes sticky, about 2-3 minutes.
-
Combine the baked cauliflower with the sticky sauce, tossing well to coat every floret. For an extra crispy finish, you can return the coated cauliflower to the oven for an additional 5-10 minutes.
-
Serve the Sticky Sesame Cauliflower on a plate, garnished with sesame seeds and sliced green onions. It’s fantastic over a bed of steamed rice or quinoa!
Optional: Drizzle extra sriracha for added spice!
Exact quantities are listed in the recipe card below.
Sticky Sesame Cauliflower Variations
Feel free to explore these delicious twists and substitutions to make this recipe your very own!
- Gluten-Free: Swap rice flour for gluten-free all-purpose flour to keep the crispy texture without the gluten.
- Spicy Kick: Add extra sriracha to the sauce or incorporate red pepper flakes for a zesty heat that will awaken your taste buds.
- Crispy Chickpeas: Replace half of the cauliflower with roasted chickpeas for an extra protein boost and delightful crunch.
- Sweet Alternative: Use agave nectar instead of honey for a vegan-friendly sweetener that still delivers that sticky glaze.
- Asian Fusion: Replace soy sauce with coconut aminos for a delightful twist and a hint of sweetness, perfect for a unique flavor profile.
- Herbal Twist: Toss in fresh cilantro or basil at the end for a vibrant herbal note that brightens each bite.
- Nutty Flavor: Sprinkle sesame seeds or crushed peanuts on top before serving, adding a delightful crunch and nutty richness.
- Veggie Medley: Mix in other veggies like bell peppers or broccoli in the baking pan for variety, enhancing the dish's color and nutrition.
Make Ahead Options
These Sticky Sesame Cauliflower florets are perfect for meal prep! You can batter and coat the cauliflower up to 24 hours in advance, simply store the coated florets in an airtight container in the refrigerator to keep them crisp. You can also prepare the sauce ahead of time and refrigerate it for up to 3 days. When you're ready to impress your family or guests, bake the cauliflower directly from the fridge for that deliciously crispy texture. Once baked, toss it in the prepared sauce and if you want to enhance the crispiness, return it to the oven for another 5-10 minutes. This way, you'll enjoy a gorgeous dish with minimal effort on busy weeknights without sacrificing flavor!
How to Store and Freeze Sticky Sesame Cauliflower
Fridge: Store the Sticky Sesame Cauliflower in an airtight container for up to 3 days. To maintain crispness, reheat in the oven instead of the microwave.
Freezer: Freeze the cauliflower before adding the sauce, placing the baked florets in a single layer on a baking sheet. Once frozen, transfer to a freezer-safe bag, and enjoy within 2 months.
Reheating: When ready to enjoy, reheat the frozen cauliflower in the oven at 375°F for about 15-20 minutes until hot and crispy. Prepare the sauce fresh for the best flavor!
Room Temperature: If left out, consume within 2 hours to ensure food safety and enjoy it at its best!
What to Serve with Sticky Sesame Cauliflower?
Brighten up your dinner table with side dishes that enhance the flavor of your crispy cauliflower masterpiece.
-
Steamed Jasmine Rice: Fluffy and fragrant, it absorbs the sticky sauce beautifully, creating a harmonious balance of flavors.
-
Quinoa Salad: This hearty salad packs protein and adds a fresh, nutty element that complements the richness of the cauliflower.
-
Garlic Green Beans: Sautéed in sesame oil, these vibrant veggies add a crunchy texture and garlicky punch that pairs perfectly with the dish.
-
Cucumber Slaw: A refreshing, tangy slaw cools the palate and adds a crisp contrast to the warm, sticky florets.
-
Miso Soup: Light and savory, this traditional soup provides a soothing complement to the bold flavors of the cauliflower.
-
Coconut Chia Pudding: For dessert, this creamy and subtly sweet treat makes a delightful finish after a savory meal to cleanse the palate.
-
Ginger Lemonade: Refreshing and zesty, it echoes the ginger notes in the dish while offering a thirst-quenching companion.
-
Seaweed Salad: With its umami flavor and unique texture, this salad brings an exotic touch that enhances the whole dining experience.
Chef's Helpful Tips
- When making Sticky Sesame Cauliflower, ensure your oven is fully preheated to 425°F for optimal crispiness.
- A common mistake is to overcrowd the baking sheet; make sure the florets are in a single layer for even cooking.
- For the batter, whisk the rice flour and cornstarch well to avoid lumps, providing a smooth coating for the cauliflower.
- Keep an eye on the sauce while thickening, as it can go from perfect to too thick quickly; stirring constantly is key to achieving the right consistency.
Sticky Sesame Cauliflower Recipe FAQs
How do I select the best cauliflower for this recipe?
Absolutely! When choosing cauliflower, look for a head that is firm and tightly packed, with no dark spots or blemishes. Ideally, the leaves should be bright green and crisp. If it feels spongy or has dark spots all over, it’s best to pass on that one!
How should I store leftover Sticky Sesame Cauliflower?
Very good question! Store your Sticky Sesame Cauliflower in an airtight container in the fridge for up to 3 days. To revive its crispiness, simply reheat it in the oven rather than the microwave, which can make it soggy. Preheat your oven to 375°F and bake for about 10-15 minutes until hot and crunchy again.
Can I freeze Sticky Sesame Cauliflower?
Yes, you can! For the best results, freeze the cauliflower before adding the sauce. First, bake the florets as per the recipe and let them cool completely. Then, place them in a single layer on a baking sheet and freeze until solid. After that, transfer them to a freezer-safe bag, where they will keep well for up to 2 months. When you're ready to enjoy them, just reheat as mentioned!
What if my batter is too thick or too runny?
That's a common concern! If you find your batter too thick, add a little more water, a tablespoon at a time, until it reaches a smooth, flowing consistency. On the contrary, if it’s too runny, you can mix in a bit more rice flour or cornstarch. It should be thick enough to cling to the cauliflower without dripping off.
Are there any dietary considerations for Sticky Sesame Cauliflower?
Definitely! If you have gluten sensitivities, opt for tamari instead of soy sauce, and this recipe is naturally vegetarian and vegan if you use maple syrup. Just be cautious with the sriracha, as some brands may contain added ingredients that are not gluten-free. Additionally, always check with your guests about allergies—for instance, sesame oil can be an allergen for some.
How can I achieve extra crispy cauliflower?
For an even crispier finish, once you’ve coated the baked cauliflower in the sauce, return them to the oven for another 5-10 minutes at 425°F. This step allows the sauce to caramelize a bit more, resulting in an addictive crunchy texture that enhances the overall experience of your Sticky Sesame Cauliflower!
Sticky Sesame Cauliflower
Ingredients
Equipment
Method
- Preheat your oven to 425°F and line a baking sheet with parchment paper.
- Whisk together the rice flour, cornstarch, garlic powder, salt, and black pepper in a large bowl.
- Add the water and sesame oil, mixing until you have a smooth batter.
- Coat the cauliflower florets by adding them to the batter and tossing gently until evenly covered.
- Transfer the battered cauliflower to the prepared baking sheet, ensuring they’re spread out in a single layer.
- Bake for 25-30 minutes, flipping halfway through.
- Sauté the ginger and garlic in a skillet with sesame oil over medium heat.
- Stir in the soy sauce, maple syrup, rice vinegar, and optional sriracha, bringing everything to a simmer.
- Create the glaze by whisking together cornstarch and cold water in a small bowl.
- Pour this mixture into the simmering sauce slowly, stirring constantly until it thickens.
- Combine the baked cauliflower with the sticky sauce, tossing well to coat every floret.
- For an extra crispy finish, return the coated cauliflower to the oven for an additional 5-10 minutes.
- Serve the Sticky Sesame Cauliflower on a plate, garnished with sesame seeds and sliced green onions.

Leave a Reply