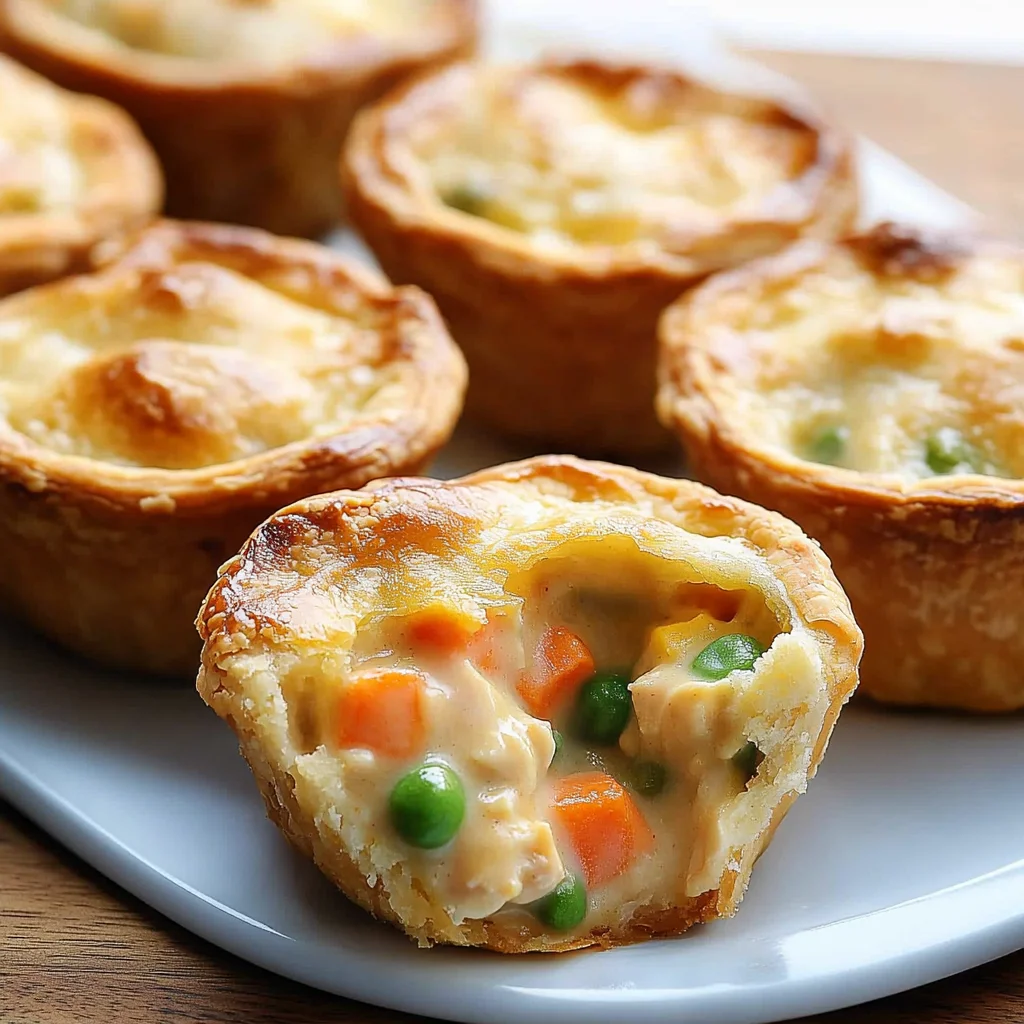
Imagine the delightful aroma of buttery pastry wafting through your kitchen as you prepare mini chicken pot pies, each one a warm hug encasing tender chicken, vibrant vegetables, and a creamy filling. The golden crust crumbles perfectly with each bite, revealing a savory blend that promises comfort and satisfaction, making these little delights irresistible for any gathering or cozy night in.
As you gather your ingredients, you’ll find that creating these charming pot pies is not only simple but incredibly rewarding. Picture the smiles on your loved ones’ faces as they dig into their own personal pie, savoring every mouthful. This recipe will soon become a cherished staple in your home, inviting everyone to slow down and enjoy the little moments together. Now, let’s dive into the steps to create these delicious mini chicken pot pies!
Why You'll Love This Recipe
- You'll adore these mini chicken pot pies for their comforting flavors and delightful presentation.
- The flaky crust perfectly complements the rich, creamy filling, making every bite a treat.
- Plus, they're incredibly easy to prepare, allowing you to whip up a batch for any occasion.
- Their individual serving size also makes them versatile enough for parties or cozy family dinners.
As I pulled the mini chicken pot pies from the oven, the warm aroma filled the kitchen. My family gathered around, and their delighted smiles as they took their first bites made all the effort worthwhile.
Now that we've set the stage, let's dive into the recipe details!
Essential Ingredients
To create the perfect mini chicken pot pies, you'll need a selection of fresh, quality ingredients that bring flavor and comfort to this delightful dish.
2 cups all-purpose flour: Sifted flour helps to aerate the dough, resulting in a lighter, flakier crust for your mini pot pies.
1 teaspoon salt: This enhances the overall flavor of the crust and filling, ensuring every bite is seasoned just right.
½ cup unsalted butter: Use cold, cubed butter to achieve a tender and flaky pie crust; it's essential for that melt-in-your-mouth texture.
6-8 tablespoons ice water: Gradually add this chilled water to help bind the dough without overworking it, keeping your crust flaky.
1 tablespoon olive oil: This is used for sautéing the onion and vegetables, adding depth to the filling's flavor.
1 cup cooked chicken: Shredded or diced chicken provides protein and heartiness; rotisserie chicken is a great time-saver here.
1 cup mixed vegetables: You can use either frozen or fresh peas, carrots, and corn for a colorful and nutritious filling.
¼ cup onion: Finely diced onion adds sweetness and aromatic flavor when sautéed in olive oil.
2 tablespoons all-purpose flour: This helps thicken the filling, ensuring it’s rich and creamy without being too runny.
1 cup chicken broth: Low sodium broth offers moisture and enhances the savory taste of the filling—look for quality brands or homemade options.
½ cup heavy cream: Adds richness and creaminess to the filling, balancing the flavors beautifully with a luxurious texture.
1 teaspoon dried thyme: This herb brings a warm, earthy note that pairs perfectly with chicken and vegetables in your pot pies.
1 teaspoon garlic powder: A subtle yet impactful addition that rounds out the savory profile of the filling without overpowering other flavors.
1 large egg: Beaten egg is combined with water to create an egg wash that imparts a beautiful golden finish on top of your pies.
1 tablespoon water: Mixed with the beaten egg for an effective egg wash that ensures even browning on your mini pot pies.
The full ingredients list, including measurements, is provided in the recipe card directly below.
Let's Make It Together
Step 1: Prepare the Pie Crust:Start by combining 2 cups of sifted all-purpose flour and 1 teaspoon of salt in a mixing bowl. The flour should feel soft and fluffy as you mix, ensuring an even distribution of salt. Next, incorporate ½ cup of cold, cubed unsalted butter into the mixture. Use a pastry cutter or your fingers to work the butter in until it resembles coarse crumbs—this is crucial for achieving that flaky texture we love in mini chicken pot pies. Gradually add 6-8 tablespoons of ice water, one tablespoon at a time, mixing gently until the dough starts to come together. Be cautious not to overwork it; you want it to be tender! Shape the dough into a disk, wrap it in plastic wrap, and refrigerate for at least 30 minutes—a step that helps the gluten relax for easier rolling.
Step 2: Make the Filling:In a skillet over medium heat, pour in 1 tablespoon of olive oil and let it warm up. Add ¼ cup of finely diced onion and sauté for about 3-4 minutes until it turns translucent and fragrant—this is where your kitchen will start to smell delightful! Stir in 1 cup of mixed vegetables (either frozen or fresh) and cook for an additional 2-3 minutes until they’re heated through. Sprinkle in 2 tablespoons of all-purpose flour over the veggies, stirring well to coat them for thickness. Gradually pour in 1 cup of low-sodium chicken broth while whisking vigorously to avoid lumps; bring this mixture to a simmer and let it cook for about 5 minutes until slightly thickened. Finally, add your cooked chicken (1 cup), ½ cup of heavy cream, 1 teaspoon dried thyme, and 1 teaspoon garlic powder. Stir everything together and remove from heat—allowing it to cool slightly will help when you fill those crusts!
Step 3: Assemble the Mini Pot Pies:Preheat your oven to 400°F (200°C) now so it's nice and hot when we're ready to bake! On a floured surface, roll out your chilled pie dough to about ⅛ inch thick—it should feel smooth under your rolling pin. Use a round cutter to cut out circles that fit nicely into your muffin tin cups. Gently press these dough circles into each muffin tin cup, ensuring they cover both the bottom and sides evenly. Fill each crust generously with the chicken filling but be careful not to overfill—this ensures that nothing spills over while baking! Roll out any remaining dough to cut out smaller circles or fun shapes for topping each pie. Place these tops on your filled pies, then crimp the edges to seal them tightly.
Step 4: Brush with Egg Wash and Bake:In a small bowl, whisk together one large beaten egg with 1 tablespoon of water to create an egg wash that will give our mini chicken pot pies that beautiful golden finish! Brush this mixture over the tops of each pie using a pastry brush—it adds not only color but an enticing sheen as well. Now it's time for baking! Place them in your preheated oven and bake for about 20-25 minutes or until you see a golden brown crust and bubbling filling peeking out—your kitchen will smell heavenly during this time! Once baked, carefully remove them from the oven and let them cool for a few minutes before serving; this helps set the filling slightly.
As we savor these delicious mini chicken pot pies, let's explore some creative serving suggestions!
You Must Know
- For perfectly flaky mini chicken pot pies, ensure your butter is cold and cubed before mixing.
- This step significantly impacts the dough's texture, creating that desirable flakiness.
- When making the filling, allow it to cool slightly before assembling.
- This prevents the crust from becoming soggy and helps maintain its crispiness—an important lesson I learned through trial and error.
- Don’t skip the egg wash; it’s essential for achieving a beautiful golden finish on your mini chicken pot pies.
- A visually appealing dish always elevates the dining experience.
With these tips in mind, you're ready to dive into the delightful process of creating your mini chicken pot pies!
Add Your Touch
Feel free to get creative with your mini chicken pot pies! Swap out the mixed vegetables for your favorites, like green beans or bell peppers, and add fresh herbs such as parsley or rosemary for a burst of flavor. For a twist on richness, try substituting half of the heavy cream with sour cream or Greek yogurt. You can even experiment with different proteins, like turkey or diced ham, to make it your own. Embrace flexibility in this recipe and enjoy the process of customizing these delightful treats to suit your taste!
Now that you’ve got the basics down, let’s dive into how to assemble these delicious mini pot pies.
Storing & Serving
To keep your mini chicken pot pies fresh, store them in an airtight container in the refrigerator for up to 3 days. When serving, consider garnishing with fresh herbs like parsley or thyme to enhance the flavor and presentation. These delightful mini chicken pot pies are best enjoyed warm, allowing the savory filling and flaky crust to shine through. Now, let’s explore some creative variations you can try!
Chef's Helpful Tips
- 1. Ensure your butter is cold when making the pie crust; this is crucial for achieving that coveted flaky texture. If your kitchen is warm, try chilling your mixing bowl and utensils as well.
- When rolling out the dough, use a light dusting of flour to prevent sticking, but avoid adding too much flour, which can make the crust tough. Aim for a smooth roll to about ⅛ inch thick for perfect mini chicken pot pies.
- For best results, let the filling cool slightly before assembling your pot pies. This prevents the dough from becoming soggy and helps retain the shape of your delicious mini creations during baking.
With these tips in hand, you’ll be ready to create perfectly flaky and flavorful mini chicken pot pies that everyone will love!
As I pulled the mini chicken pot pies from the oven, the warm aroma filled the kitchen, and my family’s delighted smiles reminded me that comfort food truly brings us together.

How to Know It’s Done Perfectly
Your mini chicken pot pies are perfectly done when the crust is golden brown and flaky, while the filling bubbles enticingly at the edges. They should feel warm and comforting in your hand, exuding a savory aroma of herbs and chicken. Remember, slight variations are normal, so trust your instincts!
Now that you know how to ensure your mini chicken pot pies are a success, let’s dive into serving suggestions to elevate this delightful dish.
FAQ
What are mini chicken pot pies?
Mini chicken pot pies are delightful, individual-sized pastries filled with tender chicken, mixed vegetables, and a creamy sauce, all encased in a flaky pie crust. They make for an easy, comforting meal or appetizer.
Can I use store-bought pie crust for mini chicken pot pies?
Yes, you can opt for store-bought pie crust if you're short on time. However, making your own crust from scratch using the provided recipe will yield a fresher and flakier result.
How do I ensure my mini chicken pot pies have a golden crust?
Brushing the tops of the mini chicken pot pies with an egg wash made from a beaten egg and water before baking will give them that beautiful golden color.
Can I customize the filling for my mini chicken pot pies?
Absolutely! While the recipe includes cooked chicken and mixed vegetables, feel free to add your favorite ingredients or substitute based on what you have on hand, keeping in mind that the overall proportions should remain similar.
How should I store leftover mini chicken pot pies?
To store leftover mini chicken pot pies, allow them to cool completely before placing them in an airtight container. They can be refrigerated for up to 3 days or frozen for longer storage; just reheat in the oven for best results.
Now that we've covered some common questions about mini chicken pot pies, let’s dive into tips for perfecting your baking technique!
Mini Chicken Pot Pies
Ingredients
- 2 cups all-purpose flour sifted
- 1 teaspoon salt
- ½ cup unsalted butter cold and cubed
- 6-8 tablespoons ice water add gradually until dough forms
- 1 tablespoon olive oil for sautéing
- 1 cup cooked chicken shredded or diced
- 1 cup mixed vegetables frozen or fresh (peas, carrots, corn)
- ¼ cup onion finely diced
- 2 tablespoons all-purpose flour for thickening
- 1 cup chicken broth low sodium recommended
- ½ cup heavy cream
- 1 teaspoon dried thyme
- 1 teaspoon garlic powder
- 1 large egg beaten
- 1 tablespoon water
Method
- In a mixing bowl, combine the flour and salt. This helps to evenly distribute the salt throughout the dough.
- Add the cold, cubed butter to the flour mixture. Use a pastry cutter or your fingers to work the butter into the flour until the mixture resembles coarse crumbs. This creates a flaky texture.
- Gradually add ice water, one tablespoon at a time, mixing until the dough comes together. Be careful not to overwork the dough.
- Shape the dough into a disk, wrap in plastic wrap, and refrigerate for at least 30 minutes. This allows the gluten to relax, making the dough easier to roll out.
- In a skillet, heat olive oil over medium heat. Add the diced onion and sauté until translucent, about 3-4 minutes.
- Stir in the mixed vegetables and cook for an additional 2-3 minutes until heated through.
- Sprinkle the flour over the vegetables and stir well to coat. This will help thicken the filling.
- Gradually pour in the chicken broth while whisking to prevent lumps. Bring to a simmer and cook for 5 minutes until slightly thickened.
- Add the cooked chicken, heavy cream, thyme, garlic powder, salt, and pepper. Stir to combine and remove from heat. Let the filling cool slightly.
- Preheat your oven to 400°F (200°C).
- On a floured surface, roll out the chilled pie dough to about ⅛ inch thick. Use a round cutter to cut out circles that fit into your muffin tin.
- Gently press the dough circles into the muffin tin cups, ensuring they cover the bottom and sides.
- Fill each crust with the chicken filling, being careful not to overfill.
- Roll out the remaining dough and cut out smaller circles or shapes to top each pie. Place the tops on the filled pies and crimp the edges to seal.
- In a small bowl, whisk together the egg and water. Brush the egg wash over the tops of the pies for a golden finish.
- Bake in the preheated oven for 20-25 minutes, or until the crust is golden brown and the filling is bubbling.
- Remove from the oven and allow to cool for a few minutes before serving. This helps the filling set slightly, making them easier to eat.
Leave a Reply