It was one of those weekends when I craved something indulgent yet playful, and that's when the idea of Homemade Red Velvet Brownie Bites struck me. Picture this: rich cocoa, a splash of vibrant red, and a hidden cream cheese surprise, all nestled into perfect little bites. As the first batch bubbled in the oven, the sweet scent of chocolate filled my kitchen, making it impossible to resist sneaking a taste!
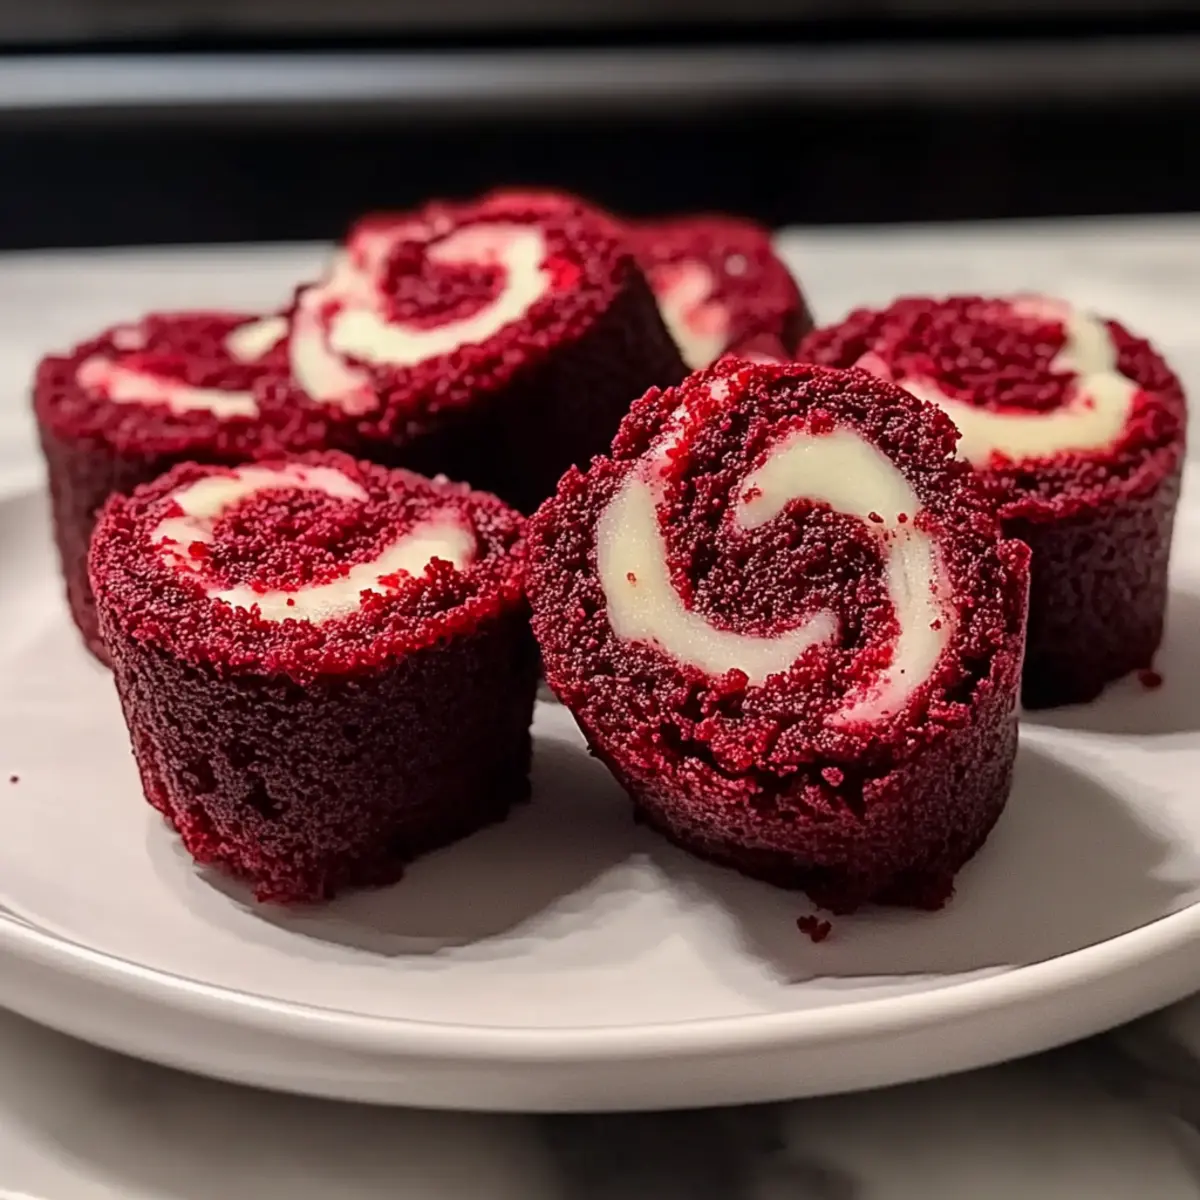
These brownie bites are the answer to your dessert dreams—quick to make and deceptively elegant. With just a handful of ingredients, you can whip up a scrumptious treat that impresses at gatherings or serves as a delightful pick-me-up for those evenings spent curled up on the couch. Whether you're hosting friends or merely satisfying a personal craving, these bites blend the best of both worlds: the nostalgia of brownies with a sophisticated twist. Let's dive into this easy recipe that's bound to become a new favorite!
Why You'll Love This Homemade Red Velvet Brownie Bites
- These Homemade Red Velvet Brownie Bites are not only quick and easy to prepare but also deliver a stunning visual appeal with their vibrant color and marbled effect.
- You'll be amazed by the rich and decadent flavor that combines cocoa and cream cheese, making each bite a delightful treat.
- Their versatility allows for serving at any occasion, from casual movie nights to elegant parties, making them a true crowd-pleaser.
- With a total time of just 32 minutes from start to finish, you can whip up a batch of these irresistible bites whenever the craving strikes.
Homemade Red Velvet Brownie Bites Ingredients
These delightful brownie bites will take your dessert game to the next level!
For the Brownie Batter
- 9 tablespoons melted butter – adds richness and moisture to the brownies.
- 1 ¼ cup sugar – sweetens the batter and balances the cocoa flavor.
- ¼ cup sifted cocoa powder – brings that deep chocolate flavor you'll love.
- ½ teaspoon vanilla extract – enhances the sweetness and complexity of flavor.
- 1 tablespoon red food coloring – gives these bites their iconic red hue.
- ⅛ teaspoon salt – balances the sweetness and accentuates the chocolate.
- ¼ teaspoon espresso powder – intensifies the chocolate flavor without tasting like coffee.
- ½ teaspoon vinegar – helps activate the baking process for a lighter texture.
- 2 eggs – bind the ingredients together and give structure to the brownies.
- ¾ cup all-purpose flour – creates the perfect texture for your brownies.
For the Cream Cheese Filling
- 9 ounces room temperature cream cheese – ensures a smooth and creamy filling.
- 3 tablespoons sugar – sweetens the cream cheese for a delightful contrast.
- ½ teaspoon vanilla extract – enriches the flavor of the filling.
- 1 egg yolk – provides smoothness and richness to the filling.

How to Make Homemade Red Velvet Brownie Bites
-
Preheat: Begin by preheating your oven to 350°F (175°C). Grease a mini muffin pan with butter or cooking spray to prevent sticking and ensure easy removal later.
-
Mix Ingredients: In a medium bowl, melt the butter, then add sugar, sifted cocoa powder, vanilla extract, red food coloring, salt, espresso powder, and vinegar. Whisk until well combined. Add eggs one at a time, mixing thoroughly after each addition. Gently fold in the flour until just mixed for a fluffy texture.
-
Prepare Filling: In a separate bowl, beat the room-temperature cream cheese with sugar and vanilla extract until smooth. Follow by folding in the egg yolk, ensuring everything is well incorporated for a rich filling.
-
Layer the Mixture: Spoon about 1 tablespoon of the brownie batter into each mini muffin cup, filling them halfway. Add about 1 teaspoon of the cream cheese filling on top, followed by another teaspoon of brownie batter. Use a toothpick to gently swirl the layers for that beautiful marbled look.
-
Bake: Place the muffin pan in the oven and bake for about 12 minutes, or until the tops are set yet the centers remain soft. This will ensure a fudgy texture that melts in your mouth.
-
Cool Down: Let the brownie bites cool in the pan for 5 minutes before Carefully removing them. Allow them to cool completely on a wire rack before indulging in those heavenly bites.
Optional: Dust with powdered sugar before serving for an added touch of sweetness.
Exact quantities are listed in the recipe card below.
What to Serve with Homemade Red Velvet Brownie Bites?
Creating the perfect indulgent experience is all about pairing your brownie bites with delightful accompaniments.
-
Fresh Berries: Juicy strawberries or tart raspberries add a refreshing contrast, enhancing the rich chocolate flavor.
Enjoy the sweet and slightly tangy burst of berries that lightens the dessert's decadence. -
Vanilla Ice Cream: Creamy ice cream brings a delightful chill and richness that complements the warmth of the brownie bites.
The combination melts beautifully in your mouth, creating an irresistible dessert experience. -
Whipped Cream: Light and fluffy whipped cream creates a perfect topping that balances the richness of the brownie bites.
It's like a cloud of sweetness on your plate, inviting you to indulge further. -
Chocolate Sauce: Drizzling warm chocolate sauce over the bites enhances the chocolatey goodness and adds visual appeal.
It’s the ultimate decadent touch that chocolate lovers can’t resist! -
Espresso or Coffee: A warm cup of espresso or coffee accentuates the chocolate flavors and provides a cozy element.
The rich, bold notes create a comforting pairing for late-night treats. -
Cream Cheese Frosting: For an extra layer of sweetness and a nod to the cream cheese filling, top with frosting.
It's a delightful homage to classic red velvet, making each bite a dream come true. -
Caramel Sauce: A drizzle of rich caramel sauce adds buttery notes that play beautifully with the brownies’ chocolate tones.
This sweet swirl transforms your dessert from great to spectacular, giving it that extra wow factor. -
Milk or Chocolate Milk: Classic beverages like cold milk or rich chocolate milk make for delightful, nostalgia-filled sipping.
Pairing these drinks with dessert transports you back to childhood, creating perfect memories with every bite.
Make Ahead Options
These Homemade Red Velvet Brownie Bites are perfect for busy weeknights and make-ahead meal prep! You can prepare the brownie batter and cream cheese filling up to 24 hours in advance; simply keep them stored separately in airtight containers in the refrigerator to maintain their freshness. When you’re ready to bake, just spoon the brownie batter and cream cheese filling into the muffin cups, swirl them together, and pop them in the oven. This approach not only saves you time but also ensures that your brownie bites are just as delicious as freshly made! Plus, you’ll have an indulgent treat waiting for you whenever a craving strikes!
How to Store and Freeze Homemade Red Velvet Brownie Bites
Room Temperature: Store leftover brownie bites in an airtight container at room temperature for up to 2 days. This keeps them soft and indulgent without drying out.
Fridge: For extended freshness, keep the brownie bites in the refrigerator in a sealed container for up to 5 days. Allow them to come to room temperature before serving for the best flavor.
Freezer: If you want to save some for later, freeze the brownie bites! Wrap them individually in plastic wrap and place them in a freezer-safe bag for up to 2 months. Thaw them in the fridge before enjoying.
Reheating: To enjoy a warm treat, simply microwave the brownie bites for about 10-15 seconds. This enhances the gooeyness of the Homemade Red Velvet Brownie Bites, making them taste freshly baked!
Homemade Red Velvet Brownie Bites Variations
Feel free to explore these delicious twists, transforming your brownie bites into something uniquely your own!
-
Gluten-Free: Substitute all-purpose flour with a gluten-free blend to enjoy these bites without the gluten worry.
-
Nutty Indulgence: Add chopped walnuts or pecans into the brownie batter for an extra crunch and nutty flavor.
-
Dairy-Free: Replace cream cheese with a dairy-free alternative and use coconut or almond milk for a vegan delight.
-
Mint Chocolate: Mix in a few drops of peppermint extract for a refreshing twist that pairs beautifully with chocolate.
-
Spicy Kick: Sprinkle in a pinch of cayenne pepper to the brownie batter for an unexpected heat that tantalizes the taste buds.
Choosing different variations allows you to create a whole new experience, making these brownie bites a canvas for your creativity. Each tweak not only changes the flavor but adds more joy to sharing or indulging in them yourself.
-
Chocolate Chips: Fold in some chocolate chips to the batter for those who crave extra chocolatey goodness.
-
Citrusy Surprise: Add the zest of an orange to the cream cheese filling for a bright, zesty flavor that lightens the dessert.
Chef's Helpful Tips
- Ensure you have all ingredients at room temperature, especially the cream cheese, to achieve a smooth filling for your Homemade Red Velvet Brownie Bites.
- Be cautious not to overmix the brownie batter after adding the flour, as this can lead to dense brownies instead of the desired light texture.
- When swirling the layers together, a gentle hand with the toothpick will create beautiful marbling without fully combining the layers.
- Keep a close eye on the baking time; even one minute can make the difference between fudgy and dry brownie bites.
Homemade Red Velvet Brownie Bites Recipe FAQs
How do I select the right ingredients for Homemade Red Velvet Brownie Bites?
Absolutely! When it comes to selecting the ingredients, start with the butter—it should be truly melted but allowed to cool slightly before mixing. For the cocoa powder, choose high-quality unsweetened cocoa to get that rich chocolate flavor. Ensure your eggs are at room temperature for smoother mixing, especially with the cream cheese filling.
How long can I store homemade brownie bites?
You can store your Homemade Red Velvet Brownie Bites in an airtight container at room temperature for up to 2 days. If you want them to last longer, move them to the refrigerator, where they can stay fresh for up to 5 days. Just allow them to warm up to room temperature before indulging again; this usually makes them taste even better!
Can I freeze these brownie bites for later?
Very! To freeze your Homemade Red Velvet Brownie Bites, wrap each one individually in plastic wrap. Next, place them in a freezer-safe bag and label the bag with the date. They’ll be good for up to 2 months in the freezer. When you’re ready to enjoy, thaw them in the fridge overnight, or pop them in the microwave for 10-15 seconds for a warm, fudgy treat!
What should I do if my brownie bites turn out too dense?
If your brownie bites end up dense, it might be due to overmixing after adding the flour, which can lead to a tough texture. Next time, gently fold in the flour until just combined. Be mindful of the baking time as well; overbaking can also result in dryness or overly firm bites. Keep an eye on them, especially during the last few minutes of baking!
Are there any dietary considerations for the cream cheese filling?
Definitely! If you or someone you're serving has dairy allergies, consider using a dairy-free cream cheese alternative. For those sensitive to eggs, you can try substituting with a flaxseed meal mixed with water (1 tablespoon flaxseed meal + 2.5 tablespoons water = 1 egg). Mix let it sit for a few minutes until it thickens to replace the egg yolk in the filling, giving you a creamy consistency without allergens.
Homemade Red Velvet Brownie Bites
Ingredients
Equipment
Method
- Preheat your oven to 350°F (175°C) and grease a mini muffin pan.
- Melt butter in a medium bowl and mix in sugar, cocoa powder, vanilla, food coloring, salt, espresso powder, vinegar, and then add eggs. Fold in flour until just mixed.
- Beat cream cheese with sugar and vanilla until smooth, then fold in egg yolk.
- Spoon brownie batter into muffin cups halfway, add cream cheese filling, then top with more brownie batter. Swirl with a toothpick.
- Bake for about 12 minutes until tops are set and centers remain soft.
- Cool in the pan for 5 minutes then transfer to a wire rack to cool completely.

Leave a Reply